Dev环境用vite替换webpack获得极致开发体验🥰
背景
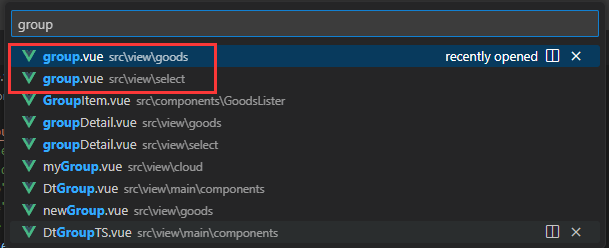
可能你会好奇的问:“我项目已用webpack配置开发和生产环境打包,好好的为啥我要切换呢?”。有这么一种情况你肯定也碰到过,在开发中需要修改某个组件,搜索时发现很多个相同名组件,但是属于不同的目录,这时你很难确定用的是哪个组件?

想到解决方案
- 方案一:严格规定项目中每个名字独立无二(不靠谱,不管单人还是多人都很难保证名字不重复)
- 方案二:利用vite-plugin-vue-inspector插件(当前非常流行的方案)
此时也面临一个问题,由于项目是基于webpack来构建的,网络上搜索了一大圈都没有找到webpack-plugin-vue-inspector 的东西,所以接下来只有两条路走。
- 第一条路:参考**vite-plugin-vue-inspector实现原理,自己实现一个**webpack-plugin-vue-inspector插件
- 另外一条路:将项目dev环境支持vite 启动开发
我选择的是将项目dev环境支持vite启动开发,原因:vite 目前已经非常成熟,而且借助esbuild极好的开发体验
配置vite
jsx
yarn add vite -D如果不知道如何开始,可以从vite官网最简单的demo开始。从demo了解下我们需要哪些东西,以及进行哪些配置?
需要的东西
index.html
html<!doctype html> <html lang="en"> <head> <meta charset="UTF-8" /> <link rel="icon" type="image/svg+xml" href="/vite.svg" /> <meta name="viewport" content="width=device-width, initial-scale=1.0" /> <title>Vite + Vue</title> </head> <body> <div id="app"></div> <script type="module" src="/src/main.js"></script> </body> </html>此时:入口脚本与html写死了,webpack中都是采用HtmlWebpackPlugin 都是指定入口html然后自动注入入口js,所以这里要调整。可以采用vite-plugin-html-template 解决
vite.config.js
jsximport { defineConfig } from 'vite' import vue from '@vitejs/plugin-vue' // https://vitejs.dev/config/ export default defineConfig({ plugins: [vue()], })示例demo看不到什么配置,我们看webpack.dev.config 的配置
由于我的项目webpack.dev.conf内容较多,我就只把相关的配置列出来。
jsx
module.exports = merge(baseWebpackConfig, {
 mode: "development",
 ...
 devServer: {
  ...
  proxy: config.dev.proxyTable,
  ...
 },
 module: {
  rules: [
   ...
   {
    test: /\.s[ac]ss$/i,
    use: [
     "vue-style-loader",
     ...autoInjectSourceMap([
      "css-loader",
      "postcss-loader",
      "sass-loader",
      {
       loader: "sass-resources-loader",
       options: {
        resources: [resolveResouce("variables.scss")],
        sourceMap: config.dev.sourceMap,
       },
      },
     ]),
    ],
   },
   ...
  ],
 },
 stats: { children: false },
 plugins: [
  new webpack.DefinePlugin({
   "process.env": config.dev.env,
  }),
  new VueLoaderPlugin(),
  new HtmlWebpackPlugin({
   filename: "index.html",
   template: config.htmlTempletePath,
   inject: true,
  }),
 ],
});
通过以上配置,我们需要给vite.config.js 添加对应的配置内容如下
- 支持环境变量定义
- 支持sass变量定义
- 支持alias定义
- 支持proxyTable
最终vite.config.js 大体内容如下:
jsx
const { defineConfig } = require("vite");
const config = require("./config");
const path = require("path");
const pcwd = process.cwd();
const htmlTemplate = require("vite-plugin-html-template").default;
const vue = require("@vitejs/plugin-vue2");
const envCompatible = require("vite-plugin-env-compatible").default;
const htmlConfig = require('vite-plugin-html-config');
const Inspector = require('vite-plugin-vue-inspector').default;

...

function normalizeAutoInjectConfig(injectConfig) {
 const links = injectConfig.links?.map(item => {
  const res = {};
  for (const key of Object.keys(item)) {
   if (item[key]) {
    res[key] = item[key];
   }
  }
  return res;
 }) ?? [];
 const headScripts = injectConfig.scripts?.map(item => {
  let { importName, globalVariableName, position, ...itemSurplus } = item;
  return itemSurplus;
 }) ?? [];
 return { links, headScripts }
}

module.exports = defineConfig(() => {
 const env = config.dev.env;
 const envObj = {};
 for (const key of Object.keys(env)) {
  envObj[`process.env.${key}`] = env[key];
 }

 return {
  define: envObj,
  mode: "development",
  resolve: {
   alias: {
    "@": path.join(pcwd, "src")
   },
   extensions: [".mjs", ".js", ".mts", ".jsx", ".json", ".vue", ".svg", ".png", ".jpg", ".jpeg"]
  },
  css: {
   devSourcemap: true,
   preprocessorOptions: {
    scss: {
     additionalData: "@import '@/style/variables.scss';",
    }
   }
  },
  server: {
   proxy: config.dev.proxyTable
  },
  plugins: [
   vue(),
   envCompatible({
    moutedPath: "process.env",
   }),
   htmlTemplate({
    entry: "./src/main.js"
   }),
   Inspector({ vue: 2, toggleComboKey: "alt-`" }),
   //! 说明:存在循环依赖解决方法,相关资料:https://github.com/vitejs/vite/issues/3033
   {
    name: "singleHMR",
    handleHotUpdate({ modules }) {
     modules.map((m) => {
      m.importedModules = new Set();
      m.importers = new Set();
     });

     return modules;
    },
   },
  ],
 }
})
总结
- 当我们无从下手时,就可以从一个官网的demo来入手
- 当从webpack切换至vite时,你想不到会出现哪些问题,就先配出一个最简单的配置,然后逐步完善掉
自从用上vite+https://github.com/webfansplz/vite-plugin-vue-inspector,我再也不用纠结我的代码有没有改对位置了,而且开发体验极速提升。赶快把dev webpack换成vite吧🥰