Electron 入门实战 02:打包和自动更新
技术选型
- electron-forge
- electron-builder
electron-forge 是Electron 官方文档介绍的,打包和发布都包含了,但是包含的坑也非常多。electron-builder下载量和集成打包非常顺利,本教程也是采用electron-buid来介绍打包。大家在技术选型的时候要多找几个,原则:选下载量高、社区活跃度高、问题少的技术,这样可以让你少走很多弯路。
由于我没有mac os 环境,就只介绍windows 环境打包和更新,按文档添加对应配置应该问题不大。
安装依赖
jsx
yarn add electron-builder -D添加打包配置
package.json
jsx{ "name": "my-electron-app", "version": "0.0.1", "main": "main.js", "author": "Potter<aa4790139@gmail.com>", "license": "MIT", "scripts": { "dev": "electron .", "publish": "electron-builder --win -p always" }, "build": { "appId": "com.my.electron.app", "productName": "my-electron-app", "publish": [ { "provider": "github", "owner": "yxw007", "repo": "electron_app" } ], "win": { "target": "nsis" }, "directories": { "output": "build" }, "nsis": { "oneClick": false, "allowToChangeInstallationDirectory": true } }, "devDependencies": { "electron": "^28.0.0", "electron-builder": "^24.9.1" }, }
打包
bash
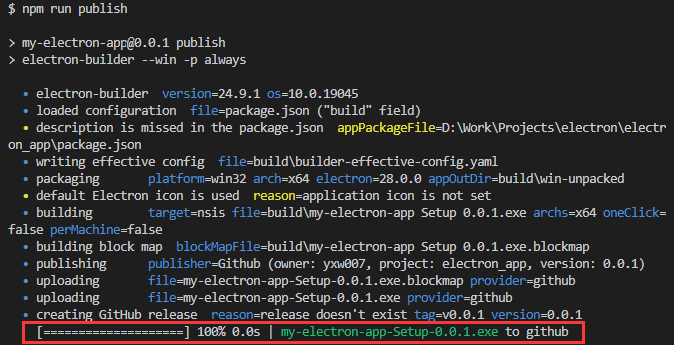
npm run publish
打包后会自动发布至github对应仓库,Release页会自动生成一个Draft,需要手动发布才能成为正式版本

集成自动更新
安装依赖
bashyarn add electron-updater electron-logindex.html,添加一个更新标签来显示我们的更新信息
html<!DOCTYPE html> <html> <head> <meta charset="UTF-8" /> <!-- https://developer.mozilla.org/en-US/docs/Web/HTTP/CSP --> <meta http-equiv="Content-Security-Policy" content="default-src 'self'; script-src 'self'" /> <meta http-equiv="X-Content-Security-Policy" content="default-src 'self'; script-src 'self'" /> <title>Electron App</title> </head> <body> <div>Electron App</div> Current version: <span id="version">vX.Y.Z</span> <p id="info"></p> <div id="message"></div> </body> <script src="./renderer.js"></script> </html>main.js 添加自动相关代码
jsxconst { app, BrowserWindow, ipcMain } = require("electron"); const path = require("node:path"); //1.添加日志显示,方便问题排查 const log = require("electron-log"); const { autoUpdater } = require("electron-updater"); autoUpdater.logger = log; autoUpdater.logger.transports.file.level = "info"; log.info("App starting..."); let win; const createWindow = () => { win = new BrowserWindow({ width: 800, height: 600, webPreferences: { preload: path.join(__dirname, "preload.js"), }, }); // win.loadFile("index.html"); win.loadURL(`file://${__dirname}/index.html#v${app.getVersion()}`); }; function sendStatusToWindow(text) { log.info(text); win.webContents.send("message", { message: text }); } //! autoUpdater 监听相关的常用事件 autoUpdater.on("checking-for-update", () => { sendStatusToWindow("Checking for update..."); }); autoUpdater.on("update-available", (info) => { sendStatusToWindow("Update available."); }); autoUpdater.on("update-not-available", (info) => { sendStatusToWindow("Update not available."); }); autoUpdater.on("error", (err) => { sendStatusToWindow("Error in auto-updater. " + err); }); autoUpdater.on("download-progress", (progressObj) => { let log_message = "Download speed: " + progressObj.bytesPerSecond; log_message = log_message + " - Downloaded " + progressObj.percent + "%"; log_message = log_message + " (" + progressObj.transferred + "/" + progressObj.total + ")"; sendStatusToWindow(log_message); }); autoUpdater.on("update-downloaded", (info) => { sendStatusToWindow("Update downloaded"); //! 下载完后立即更新 autoUpdater.quitAndInstall(); }); app.whenReady().then(() => { //! 主进程,处理渲染进程的消息 ipcMain.handle("ping", () => { return `I'm ipcMain`; }); // ! 1.监听来自渲染进程的消息 ipcMain.on("message-from-renderer", (event, arg) => { console.log("Renderer Process Message:", arg); //! 2.发送回复消息到渲染进程 event.sender.send("message-from-main", "Hello from main process!"); }); createWindow(); console.log(process.platform); app.on("activate", () => { if (BrowserWindow.getAllWindows().length === 0) { createWindow(); } }); }); app.whenReady().then(() => { //! app ready 自动检查更新 autoUpdater.checkForUpdatesAndNotify(); console.log("app ready: checkForUpdatesAndNotify"); }); app.on("window-all-closed", () => { if (process.platform !== "darwin") { console.log("quit"); app.quit(); } });
重新发布版本
jsx
npm run publish此时github 对应仓库Release 页面又会多一个Draft版本,点击修改让其发布,然后更新package.json 中的版本号,再重新发布一次。
为了让你看到这个过程,你可以先下载我演示的my-electron-app-Setup-0.1.4.exe,安装完后打开会检测自动更新,安装完后再打开就会看到更新至v0.1.5


总结
- 技术选型时尽量多选几个,选择下载量高、社区活跃高(发包更新频率、bug修复数量、bug修复速度综合对比下)的技术,可以让你少踩坑
补充
说明:如果更新出错,可以到C:\Users\Administrator\AppData\Roaming\xxx\logs 目录下查看main.log 日志查看具体问题
完整:demo
参考文献
以上: 如发现有问题,欢迎留言指出,我及时更正