webpack 03:实现一个自定义loader
相信利用webpack打包项目,都会碰到各种内置的loader,比如:vue-loader、babel-loader、svg-sprite-loader、url-loader等等,其实他们的作用就是进行资源转换,最近碰到一个需求就刚好需要这样一个东西,比如:ios平台打出来的包需要某个功能,pc平台却不需要某个功能,所以就可以利用loader的机制来实现。下面给出一个简单的示例
概要内容
创建步骤
npm init -y
package.json (说明:网上提供的示例基本不提供具体的插件版本,导致要么这个问题要么哪个问题,版本不兼容太正常了。为了保证示例能运行,方便npm install 所以把package.json 直接贴出)
json{ "name": "03-custom-loader", "version": "1.0.0", "description": "", "main": "index.js", "scripts": { "dev": "webpack-dev-server --config webpack.config.js", "debugger": "node ./node_modules/.bin/webpack --config webpack.config.js", "build": "webpack" }, "keywords": [], "author": "", "license": "ISC", "devDependencies": { "@babel/core": "^7.16.0", "@babel/preset-env": "^7.16.0", "loader-utils": "^2.0.0", "webpack": "^5.64.0", "webpack-cli": "^4.9.1", "webpack-dev-server": "^4.5.0", "html-webpack-plugin": "^5.5.0" } }创建webpack.config.js
jsonconst path = require("path") const HtmlWebpackPlugin = require("html-webpack-plugin"); const HotmoduleReplacementPlugin = require('webpack/lib/HotModuleReplacementPlugin'); module.exports = { mode:'development', entry:"./src/index.js", output:{ filename:"[name].js", path:path.resolve(__dirname,"dist") }, devServer:{ client: { logging: "info", overlay: true, progress: true, }, hot:true, port:9000, }, resolveLoader: { alias: {//创建loader别名 "replace-name-loader": path.resolve(__dirname, "./build/replace-name-loader.js"), "replace-age-loader": path.resolve(__dirname, "./build/replace-age-loader.js"), } }, module:{ rules:[ { test: /\.js$/, use:[{ loader: 'replace-name-loader', options: { name: "Alice", }, },{ loader: 'replace-age-loader', options: { age: 100, }, } ], }, ] }, plugins:[ new HtmlWebpackPlugin({ filename:"index.html", template:'index.html', inject: true }), new HotmoduleReplacementPlugin() ] }babel.config.js
jsonmodule.exports = { presets: [ [ '@babel/preset-env', { targets: { node: 'current', }, }, ], ], };创建index.html
json<!DOCTYPE html> <html lang="en"> <head> <meta charset="UTF-8" /> <title>title</title> <style> </style> </head> <body> </body> </html>创建src中的文件
index.js
jsximport { name} from "./name.js"; import { age} from "./age.js"; function showInfo(){ console.log(`${name}的年龄是${age}岁`); } showInfo();age.js
jsxexport const age = 18;name.js
jsxexport const name = "小明";
创建loader
replace-age-loader.js
jsx/** * @param {*} source loader 匹配的资源文件内容 * @returns */ const loaderUtils = require('loader-utils') const { SourceMap } = require('module'); module.exports = function(source) { let {age} = loaderUtils.getOptions(this); const content = source.replace("18",age); this.callback(null,content,SourceMap) }replace-name-loader.js
jsx/** * @param {*} source loader 匹配的资源文件内容 * @returns */ const loaderUtils = require('loader-utils') const { SourceMap } = require('module'); module.exports = function(source) { let {name} = loaderUtils.getOptions(this); const content = source.replace("小明",name); this.callback(null,content,SourceMap) }
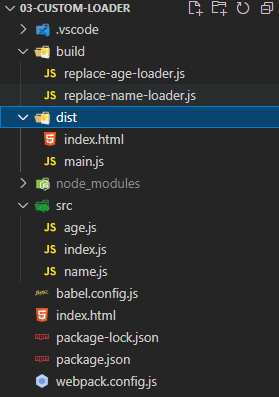
最后的目录结构

npm run dev 效果如下

完整示例:https://github.com/yxw007/H5-Learn/tree/master/webpack/03-custom-loader
总结
- use 里面的loader 是最后一个往第一个执行的
- loader请保持单一原则,一个loader只做一件事